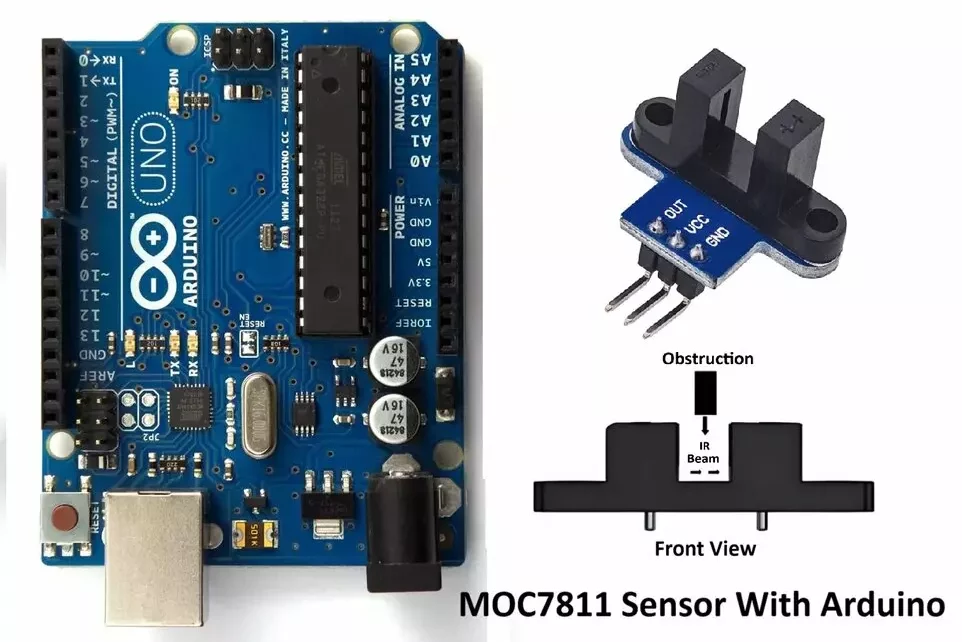
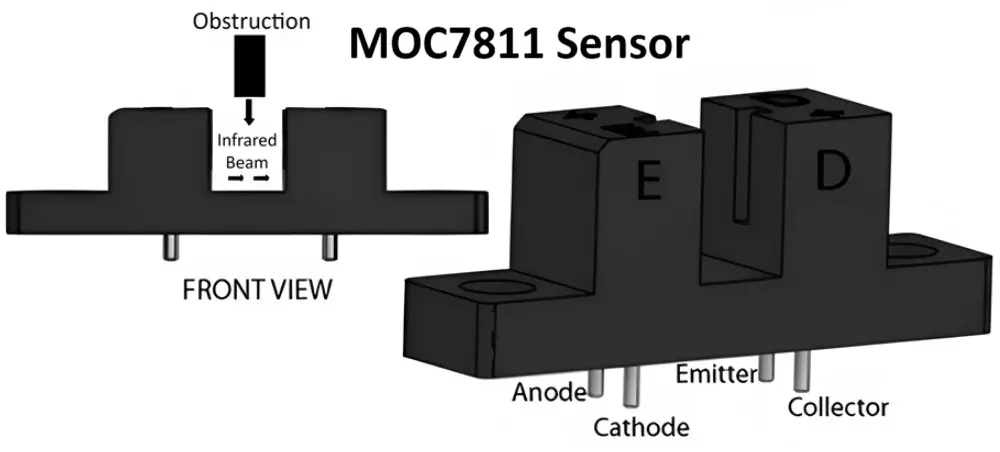
The MOC7811 is an optical sensor module commonly used for detecting motion or presence. It consists of an infrared emitter and a phototransistor, typically housed in a black plastic casing with a small gap in between for the passage of light. The emitter emits infrared light, and if an object comes within the range of this emitted light, it reflects some of it back towards the sensor. The phototransistor then detects this reflected light, allowing the sensor to detect motion or presence.

The MOC7811 sensor is often used in various applications such as proximity sensing, object detection, and security systems. It is relatively simple to use and can be interfaced with microcontrollers like Arduino for various projects. By measuring changes in the intensity of the reflected light, the sensor can detect motion or the presence of objects within its range.
Keep in mind that while the MOC7811 sensor is useful for detecting motion or presence, it has limitations. For instance, it may have difficulty distinguishing between different objects or detecting motion in certain lighting conditions. Additionally, its range and sensitivity may vary depending on the specific application and environmental factors. Therefore, it’s essential to understand its characteristics and limitations when integrating it into a project.
Interfacing of MOC7811 Sensor with Arduino
To create a basic circuit using the MOC7811 sensor, you’ll need the sensor itself, a few supporting components, and a microcontroller if you want to interface it with a digital system such as an Arduino. Here’s a simple circuit schematic for interfacing the MOC7811 sensor with an Arduino:
- Connect the positive terminal of your power supply (+5V) to one terminal of the resistor R1 (consider a 33kΩ resistor).
- Join the other terminal of the resistor R1 to one terminal of the MOC7811 sensor.
- Connect the other terminal of the MOC7811 sensor to a digital input pin on the Arduino (e.g., digital pin 2).
- Connect the ground (GND) pin of the Arduino to the ground (GND) terminal of your power supply.
A resistor is used to limit the current flowing through the infrared LED of the MOC7811 sensor to avoid damaging it. Its value depends on the specific requirements of your circuit and the characteristics of your sensor, but a typical value could be around 330 ohms.
In your Arduino code, you can read the digital input pin to detect changes in the sensor’s output. When the sensor detects motion or an object, it will cause the digital pin to change its state, which you can then detect and act upon in your code.
Here’s a simple Arduino code example to read the sensor’s output:
```arduino
const int mocPin = 2; // Connect the sensor output to digital pin 2

void setup() {
pinMode(mocPin, INPUT);
Serial.begin(9600);
}

void loop() {
int mocState = digitalRead(mocPin);
if (mocState == HIGH) {
Serial.println("Motion detected!");
} else {
Serial.println("No motion detected.");
}
delay(500); // Adjust delay as needed
}
```
This code sets up the digital pin connected to the sensor as an input and continuously reads its state. If the sensor detects motion (the state is HIGH), it prints “Motion detected!” to the serial monitor, otherwise, it prints “No motion detected.” Adjust the delay according to your specific requirements.
Simple Speed Sensor using MOC7811 and Arduino
To use the MOC7811 sensor as a speed sensor, you’ll typically need to count the number of interruptions or pulses generated by the sensor as an object passes by. Here’s a basic Arduino code example to demonstrate how you can use the MOC7811 sensor to measure the speed of an object passing by:
const int sensorPin = 2; // MOC7811 output connected to digital pin 2
unsigned int count = 0; // Counter for pulses
unsigned long previousMillis = 0; // Stores the time of the last pulse
unsigned long interval = 1000; // Interval for calculating speed (in milliseconds)

void setup() {
pinMode(sensorPin, INPUT);
Serial.begin(9600);
}

void loop() {
unsigned long currentMillis = millis();

// Read the sensor input
int sensorState = digitalRead(sensorPin);

// If the sensor detects an object (transition from LOW to HIGH)
if (sensorState == HIGH) {
count++; // Increment the pulse count
previousMillis = currentMillis; // Update the time of the last pulse
}

// If the specified interval has elapsed, calculate speed
if (currentMillis - previousMillis >= interval) {
// Calculate speed (objects per second)
float speed = count / (interval / 1000.0);

// Reset the counter and print the speed
count = 0;
Serial.print("Speed: ");
Serial.print(speed);
Serial.println(" objects per second");

// Reset the time of the last pulse
previousMillis = currentMillis;
}
}
In this code:
- The sensor pin (sensorPin) is defined as pin 2, but you can change it according to your setup.
- The count variable stores the number of pulses detected by the sensor.
- The previousMillis variable keeps track of the time of the last pulse.
- The interval variable sets the time interval (in milliseconds) over which the speed is calculated. You can adjust this value based on your requirements.
- In the loop, the code continuously monitors the sensor output. When the sensor detects an object (transition from LOW to HIGH), it increments the count variable and updates the time of the last pulse.
- After the specified interval has elapsed, the code calculates the speed using the formula: speed = count / (interval / 1000.0). It then prints the speed in objects per second and resets the count variable and the time of the last pulse.
Make sure to connect the MOC7811 sensor output to the digital pin specified in the code and adjust the code accordingly if you’re using a different pin. Additionally, you may need to calibrate the speed calculation based on the characteristics of your setup.
Application of MOC7811 Optoisolator Sensor
The MOC7811 sensor finds various applications in automation, robotics, security systems, and industrial control systems. Here are some common applications:
Motion Detection:
The MOC7811 sensor can detect motion by sensing changes in the reflected infrared light. It is used in security systems, automatic door openers, and lighting control systems to trigger actions when motion is detected.
Proximity Sensing:
It can be used to detect the presence of objects within a certain range. This is useful in applications such as automatic faucets, hand dryers, and paper towel dispensers in restrooms, where objects need to be detected for activation.
Object Detection:
The sensor can be employed in industrial automation to detect the presence or absence of objects on conveyor belts or assembly lines. It helps in controlling the movement of objects and preventing collisions.
Robotics:
MOC7811 sensors are used in robotics for obstacle detection and navigation. Robots equipped with these sensors can detect obstacles in their path and navigate around them safely.
Home Automation:
In home automation systems, the sensor can be used for tasks such as turning on lights when motion is detected in a room, adjusting thermostat settings based on occupancy, or triggering security alarms.
Counting Applications:
The sensor can count objects passing through a particular area. This is useful in applications like traffic monitoring, people counting in retail stores or events, and inventory management in warehouses.
Position Sensing:
It can be used to determine the position of objects or components in machinery or equipment. For example, it can be used to detect the position of a rotating shaft or a moving part in a system.
Alarm Systems:
The sensor is often integrated into alarm systems to detect unauthorized entry into a secured area. When motion is detected, the sensor triggers an alarm to alert the occupants or authorities.
These are just a few examples of how the MOC7811 sensor can be used. Its versatility and reliability make it a popular choice in various electronic applications that require motion or presence detection.
Datasheet of MOC7811 Sensor Types of sensors
You can get this sensor for around 20 to 30 rupees per piece in market. If you are trying to purchase online, try to purchase in bulk or with many components, you will get it for low price.
What is a Sensor? Types of Sensors, Classification & Applications